Friday, March 27, 2009

The Goldie Look

Goldie theme seems to be everyone's favorite! It has a simple appearance with just enough portion of glamour and bling.

Originally I wanted to highlight the 24K gold-foiled Italian (Murano) glass beads in a lighter design without using many crystals (as I normally do in most of my work) and the bad part was that I didn't really know how to achieve it. It was after a few back-and-forth browsing of jewelry related books, the idea finally popped in my head. The result was the first Goldie necklace in which the Italian beads were paired with deep blue and bright red Swarovski crystals on bright gold-colored wires.


Early this year I had a custom order for Goldie necklace and earrings set and I simplified the necklace design by reducing the number of crystals. I also opted bright blue and green for the colors of the crystals. The resulting piece filled my expectation well. It still retained the substantial presence of gold shine and crystal sparkle.
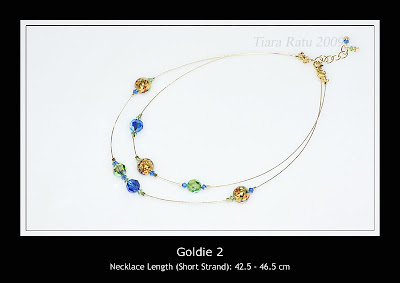

And recently I completed another request for Goldie necklace. The design was based on Goldie 2 and the colors followed Goldie 1. In other words, Goldie 3 was a combination of two earlier designs.


Having made three similar necklaces, I don't think I'll get tired of making more of this Goldie line. It's fun to make and surely a beautiful piece.

Sunday, March 22, 2009

Fairy Rose

Naming a piece of work is not an easy task and it proves right for me. There are times I can create appropriate names with ease; other times I can go completely dumb!

This time I can't find any better name than Fairy Rose bracelet. Looking at the pastel colors of the artisan lampwork focal, they are a mix of pink, peach, white and green with a hint of yellow reminding me of colors in fairy movies, princess stories or even girly princess dresses. A name that relates to one of these features would be fine I thought and right after I completed the bracelet, I knew what to name it.

It's officially spring time in here and this bracelet is one of the designs I've made recently to welcome the warmer season. It has feminine look with the scuptural rose that really pops against the soft-colored background and the flirtly dangles that move joyfully on one's wrist. Simply beautiful!

Thursday, March 19, 2009

Hop into Spring Sale!

I am welcoming in the beginning of Spring by having a 20% off sale in my Etsy shop this Saturday and Sunday March 21st and 22nd. Plus, every purchase will get your name entered into a drawing for a surprise gift worth $15! The drawing will be held on Monday morning, and the gift will be shipped at no extra charge with the winner's purchase. Stop on by this weekend and Happy Spring to you! :)

Wednesday, March 18, 2009

DIY your pearl powder mask

Pearl Powder Mask contains processed high-grade pearl powder from South Sea. Pearl powder is refined through modern bioengineering techniques to fully preserve the active components in natural pearl. It can inhibit the synthesis of melanin and help reduce wrinkles step by step.

Due to its miraculous effects, pearl has been used by ancient royal ladies and modern personages .

According to ancient Chinese history artistes in the Tang Dynasty began using Pearl Powder on their faces to protect and beautify their skin when applying stage makeup. During the Ching Dynasty Empress Dowager began taking Pearl Powder internally as well as applying it to her face.It is believed that the women of far-east owe their pure, clean, and glittering skin to their traditional usage of pearl products.

Yang Kueifei is a great beauty in the Tang Dynasty.
She likes using pearl powder on her faces to keep complexion.


There I will recommend how to DIY pearl powder mask.

Ingredients: Nami pearl powder, honey, egg

DIY your pearl powder masker usage:

Normal skin: 1-2 teaspoon of Egg white and 1 teaspoon of pearl powder. Mix together and apply to face and leave for 15-20mins then rinse with warm water. Egg is great for acne, oily skin, and firming and pearl powder is good for inflammatory.

Oily skin: 1 teaspoon of honey and 1 teaspoon of pearl powder. Apply as mask and leave for 15 minutes. Skin will become brighter and smoother.

Dry skin: mix 1 teaspoon pearl powder with enough olive oil to form a thin paste. Apply to clean, dry skin; then, after 10 minutes rinse off with warm water.

Mix skin: 1 teaspoon of pearl powder and 1 teaspoon of milk. Leave for 15minutes and leave for 15-20 minutes. Milk will make your skin soft and bright.

DIY your pearl powder mask is easy. Summer is close at hand. Let's keep the skin wet and whiten.

Tuesday, March 17, 2009

Pure Bliss

What a joy to be able to hold and marvel at fine beautiful freshwater pearls!

I was very pleased when my pearl order from one of Asian countries arrived. The pearls were roundish (potato shape) in creamy white color and all had smooth surface (no pits, no bumpy spots, no scratch), uniform size and thick nacre. Simply perfect! And this Pure Bliss set was the result from pairing these beauties with Swarovski crystals. The pearly glow and the crystal sparkles seemed to blend nicely and created an overall look of simplicity and elegance with drops of glitters.


Click here to see the set in full.